Struggling [to be] a[n] artist


{23 August 2013}  

I had been putting off making a dress form because I wanted one more ~true~ to my measurements, and doing an expanding foam kind, and then I realized, I don’t think I’ll be doing anything that is that form fitting. Not right now at my skill level. It’s still so low. 

I’m hoping to be able to make the paper tape one in a bit and then to make like a light drape fabric over it so if I need to ever pin something to it, I can use that. Yeah this idea will add a bit to it, but most of what I want to make right now is a bit more lose and forgiving on that front anyway! I can’t just wait around for the time to make a perfect form. 


The first of her “DIY Pressing Tools” tutorial series, this is a great post on how to make on yourself, and bit of why you want one!.

Those of you who sew regularly know how important it is to have the right pressing tools. And those of you novices, will learn the importance of having one (I know I sound like a granny right now, bare with me, I am getting somewhere).

Tailor’s Ham (or Dressmaker’s Ham) is one of those tools all seamstress should have at hand and as The Vogue Sewing Book would say, it is not substitutable. You see, the little tailor’s ham is supposed to simulate our actual body’s curve. A faithful ham will make you say goodbye to those eyesore wonky curve seams. Tailor’s ham will help you create a more professional and good looking garment.

However (ha!) an enthusiastic but low budget seamstress may feel that paying for a lump of sawdust stuffed cushion is a bit of a rip (yes you guess who!). I mean one of Dritz ham will set you off at US$9.55 but I mean you can make a dress with that (scrooge mcSai iis here)! And isn’t there something rewarding about making your own? You can choose whatever colour ham you want to have. That is why, my dear readers, I would like to share with you a few easy steps to make your very own personalised tailor’s ham!

What Size is your Ham?

Hams come in many different sizes and shapes(!!), to suit different types of garments and purposes of course. In this tutorial I will show you how to make the simplest, most commonly used by home sewist (just like those Dritz Pressing Hams). But don’t worry I’ll give you patterns for a couple of different size/shape hams, should you be interested in making more. See bottom of the post for free pattern download.

Things you’ll NEED:

  1.  6″ x 9″  Tailor’s Hams  pattern
  2. 10″x8″ Firmly Woven or 100% Cotton fabric
  3. 10″x8″ Wool Fabric
  4. 25″x10″Plain 100% Cotton (like the unbleached muslin)
  5. Sawdust for stuffing
  6. A dowel or something to help you stuff the sawdust

fig. a

Cut out the pattern pieces as per fig.a;  1 x Contrasting Cotton, 1 x Wool and 3 x Plain Cotton

fig. b

Baste constrasting cotton & 2 piece of plain cotton together. Baste wool fabric & 1 pieces plain cotton toghether. Baste all the way around the pieces.

fig.3

With right sides of fabric together (contrasting cotton & wool facing each other) stitch, using 1/2″ seam allowance and 2-2.5mm stitch length, the two sets of fabric together. Leave  about 3″ gap at the widest end for turning out and stuffing.

Notch the corners to make sure your ham will turn out with smooth curve but only do it at the curviest point so that you don’t end up weakening the seam of the ham. Turn the ham shell right side out.

Now lets get on with the stuffing. I initially wanted to use fine sawdust (just to make sure there is no lump and bump on my ham), but with no avail I couldn’t get hold of any. I went to a couple of local carpenter and wood workshops and they told me that in these days and ages they are not allowed to sell it anymore (due to health and safety reasons). I dragged Sirio with me (you see his Spanish is native and mine is umm bad), and we weren’t very convinced about the prohibition on selling sawdust, I know the health and safety makes sense, but anyway…


In the end I went to a supermarket and got a pack of (1.5L worth) fluffy sawdust(untreated soft wood shavings), which costs me about €1.80. You know, the one they use for hamsters, rabbits and cute tiny animals. With this amount I should be able to make a 6¨x9¨ tailor´s ham and a 3¨x 15¨ seam roll. It will have to do. I think the stuff is soft and just about fine enough to create a smooth ham. It has to be better than scrap fabric, which dare I say, will make my ham lumpy.

fig.5

Before you begin stuffing the ham, find a place where you can vacuum easily as it get quite messy. Use a funnel or a spoon. You can make a funnel from a piece of cardboard. Start filling the ham till you reach the half way point. Press and compact the sawdust into the seam as much as you can. The ham will be a little wonky at first but keep pushing. Use a dowel or a stick. I use chopstick to keep pushing the sawdust into the corner seams. Tried to smoothen it out at the same time and then keep filling to the top. Make sure you fill the sawdust as much as you possibly can to make sure your ham is firm.

fig.6

Once filled, press the overflowing sawdust in with a dowel or spoon or your hand and pin the opening. Hand fell stitch to finish, using embroidery floss for extra strength.

Clean your ham using vacuum cleaner and voila! You are done!


Thanks for reading my tutorial, I hope it is helpful and if you have any questions don’t hesitate to ask 🙂

Enjoy your ham!


cheekychinadoll:

I was too lazy to make a special photo so I’m just gonna make a text post due to lazyness and I apoligize for some blurry pictures I took some of these at 2 AM

Things you will need:

masking tape(or painters tape something like that NOT DUCT TAPE OR SCOTCH TAPE)

a basic shirt or pair of pants you are making a pattern from

newspaper

and obviously some sort of sharpie or pen and scissors 

Read More


pacobean:

It seems a lot of people are intimidated at the idea of making their own piping or even using piping at all. After a lot of trial and error, I think I have a pretty easy method for both making piping as well as sewing it into a seam. This is a tutorial for how to create your own piping using the Paco Bean Dottie Vintage Bag as an example. This would also be nearly exact with the PB Dorothy Day Tripper as well. Try to ignore the wonkiness of the machine basting in the pics, something is up with my tension. Sigh 

Click here to download a printable PDF version of this tutorial.

MAKE YOUR PIPING

You will need: 5/32" cotton cording, fabric, zipper foot, pins, thread

1. Cut bias strips.
Cutting strips on the bias of the grain allows it more flexibility and stretch around corners and curves. Fold your fabric diagonally, matching the side edge with the bottom edge and press like so. This will give you a 45 degree line to align your strips with.

photo-3

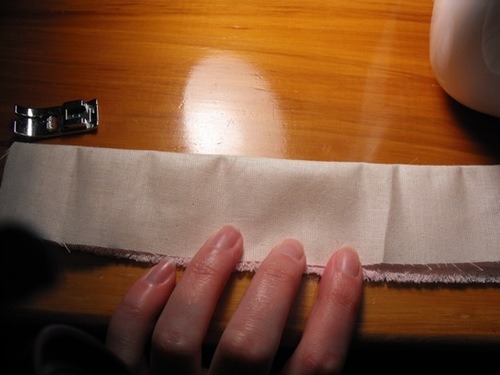
Cut as many strips as your project requires (usually one strip is about a yard for me), parallel with the 45 degree crease you made. For my patterns, I use 1 ½" wide bias strips, which ends up giving close to a ½" seam allowance when sewn into the bag.

2. Connect bias strips.
We need to connect our bias strips to form one big long strip. Place two strips right sides together at a 90 degree angle, aligning the “wide angle point" of each strip end with the other strip’s edge.

Photo Jul 23, 9 30 35 PM

Stitch at a 45 degree angle from the top left overlapping point to the bottom right overlapping point.

Photo Jul 23, 9 33 22 PM

Then trim the excess, fold flat and press the seam. Repeat with additional strips.

Photo Jul 23, 9 33 50 PM Photo Jul 23, 9 34 08 PM

3. Prepare piping.
Starting at one end of your bias strip, lay your cotton cording on the wrong side of your bias strip and fold overtop in half. Slide a pin through the folded strip, and through the cotton cording, securing both. Work your way along the bias tape, folding & pinning the cording inside, maybe every 8"-12" or so.

Photo Jul 23, 9 43 44 PM

4. Sew piping.
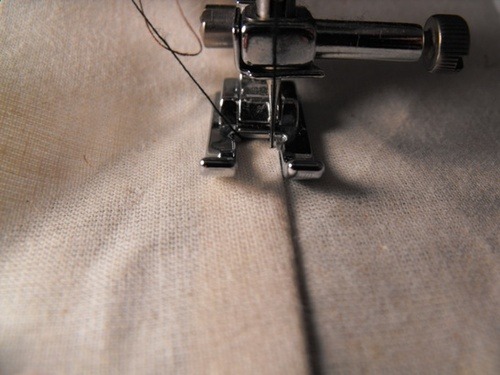
Put your machine’s zipper foot on and adjust your stitch length to the longest setting. Starting at one end of the piping, stitch along the cording to encase it in the bias tape.

Photo Jul 23, 9 47 50 PM

We don’t want it super tight, we will be sewing a closer seam later to tighten it up. For this machine basting, I leave my needle in a “center" position, then later, I simply move my needle to the left to tighten up the piping while sewing at the same seam allowance. Keep your stitching as uniform as you possibly can, this will ultimately be the guide we use in the end. Now you have your very own handmade piping!

Photo Jul 23, 9 58 33 PM

SEW YOUR PIPING INTO A SEAM

We need to pin and machine baste the piping onto one of the pieces you will be sewing. In this case, I’m attaching the piping on the main panel of the Dottie bag before I sew it to the top/sides/bottom panel (placing it in between them in the seam). If you were making a pillow, for example, you’d pin and machine baste piping to all 4 edges of one of the square pillow panels before sewing it to the other square pillow panel.

5. Attach piping to panel.
For the Dottie main panel, I pressed it in half to give me a center crease. Starting in the bottom center of the panel and leaving about 1" of piping hanging off the piece, match raw edges of piping to raw edges of main panel and pin. With these kinds of curves, you can never have too many pins! Match the raw edges as exactly as you can, especially around the tighter curves. If you have trouble getting the piping to turn easily around the curves, or need to do a 90 degree corner, you may clip the piping about 3/8" in from the raw edge. I find piping goes around curves much nicer without clipping so I only do it when necessary.

Photo Jul 23, 10 19 20 PM

When you get back where you started, at the bottom center, overlap the piping as shown, and let 1" of the end hang off the piece. The overlapping piping at start/end won’t be seen much being on the bottom of a bag. There are other ways to finish the ends, but for the sake of learning, we are going with the easy overlap.

Photo Jul 23, 10 19 47 PM

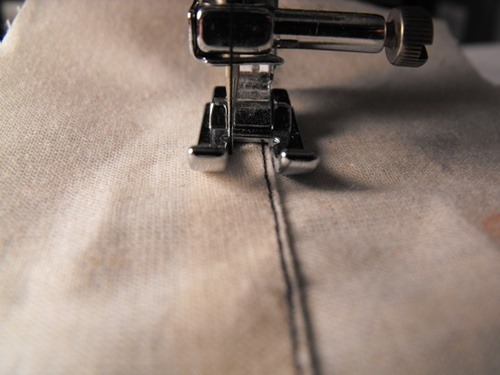
At your longest stitch setting and with your zipper foot, start wherever you’d like and sew right along the same stitching you created when you made the piping to attach the piping to the main panel. When you reach the “overlap" at bottom center, stitch straight across the piping.

Photo Jul 23, 10 20 43 PM

Photo Jul 23, 10 25 58 PM

Turn your piece wrong side up and you can see the machine basting stitching you just made.

Photo Jul 23, 10 25 11 PM

6. Sew piping into seam.
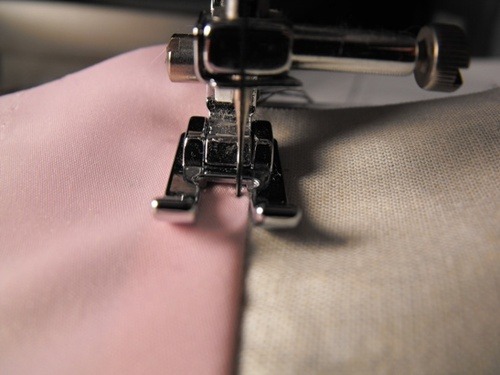
Now pin your pieces right sides together (for the Dottie, it’s pinning the main panel to the bottom/top zippered piece) with the piping sandwiched in the middle. Match all raw seams together very well. Precision is key when piping is involved, well more so than if it was just a regular seam sans piping.

Photo Jul 23, 11 48 50 PM

With the wrong side of the panel that you basted the piping to facing up, switch back to your regular stitch length (2 for me and my Janome), and sew 1/8" INSIDE the line of stitching you can see. This is where I simply move my needle to the left 1/8" and sew at the same seam allowance as I had been when basting the piping to the main panel. This will get the piping nice and tight.

Photo Jul 23, 11 49 38 PM

Now turn your item right side out and look at your piping, and feel the entire way around. There may be spots that need to be tightened up a bit, just turn wrong side out and sew a little closer in that particular spot. You’ll get the feel of it pretty quickly.

Photo Jul 23, 11 58 40 PM

Now sit back and admire your piping! You’re all done! Unless you’re making the Dottie, in which case, you get to do it all over again with the other side. 🙂


{4 August 2013}  

pura-sewing:

So now that I’ve finished my course I said I’d make some tutorials!

I thought I’d start with some really basic stuff, which is mostly either common knowledge or easy to pick up yourself, etc. But for beginner sewers it might help!

So I’m going to cover edge stitching, top stitching and understitching. Edge stitching and top stitching are pretty obvious – a lot of clothing has this kind of stitching and is on the outside of garments. Understitching isn’t as obvious, I think. I never knew what it was when I was self taught! It’s pretty much stitching on the under side of garments which helps lining to not roll towards the outside and become visible (like on pockets and vest lining, etc).

I think I’ll start with talking about machine feet, as it was an issue for me. I trained on an industrial sewing machine which has a different kind of foot that makes it easy to sew with. Domestic machines come with something similar.

image

On the left is the machine foot that I personally think is best and easiest to use – industrials have one like this but with a smaller gap. On the right is some weird foot sewing machines come with anyway. I’m a bit retarded and only realised I had the one on the left AFTER I sewed on several meters of bias onto a shirt while using my eye to keep straight rather than the food edge, haha. The reason is that it’s easier to see where the needle is and you can line your fabric up with the side of the foot!

image

And starting with edge stitching. On a seam, put the seam allowances under the side where the needle is – so on the left side of this example. And line the seam up with the food edge and position the needle about 1mm onto the edge (this is for domestics where you can move the needle position, industrials you can line the foot up and the foot gap is the perfect space for edge stitching). While sewing pull the left side of the fabric/side you’re stitching on slightly so that it’s getting stitched on flat and not stitching down too much fabric. Sweeping it outwards, not up or down, etc.

image

Next is top stitching! You can see my edge stitching in the picture and then 5mm to the left of it is top stitching. So move your needle over! I worked out my foot’s gap is made to be the perfect space for this (industrials have the outer edge of the foot as the perfect space). And just stitch down the same as before with the foot lined up with the fabric. And again, ‘sweep’ the fabric to the left to make it lie flat. If you move it up too much or down too much you’ll cause the effect of roping, which is when the fabric looks a bit twisted and funny.

I’m not sure about domestics, but industrial machines you can edge and top stitch on either side of the foot, so it’s just up to personal preference on what side you do it on. This stitching can be used on seams where ever you want it to have effect! For instance, jeans quite often have edge and top stitching on the inside leg seam, which also gives it a bit more strength.

image

Ta-da! I nice edge and top stitched seam! I’m not sure if my stitching was wonky or my fabric was just bumpy, haha. (I’m still getting used to this on a domestic machine).

Now for some understitching!

image

I’ve decided to make the ‘lining’ pink fabric to make it more obvious about how to do it. Once again, have the seam allowance underneath the side you are stitching on top of (it’s more important for understitching). Then do the exact same thing as edge stitching! They are very similar but the difference is that understitching is used on the underside of things, where you can’t see it. Like a collar where you want it to stay flat and the edges in the right place but don’t want the stitching visible on the outside (although it’s common on collars). It holds the fabric in place!

image

See like this! Pretend this is the bottom hem of a vest or coat, etc. It’s the bottom, the lining won’t roll to be visible and it sits nice and flat.

This kind of stitching can also be used on faced necklines and arm holes (when sleeveless) when you don’t want the stitching to show.

image

And this is what the underside/lining looks like! A nice little neat stitched line that holds everything in place (: I tried taking a close up picture but my camera was being a dick and wouldn’t focus.

If you have any questions, please ask! I will do my best to help! I’m pretty bad at explaining things 😛

Or if there’s anything to do with sewing that you want help with also ask! I need more ideas for tutorials! I can also pattern make, so if you have a pattern related question, ask away! I was thinking of doing tutorials like dart moving on bodices and such or how to change designs on commercial patterns, because I know a lot of cosplay involves this sort of thing, hahaha.


{4 August 2013}  

leafypeachy:

chimericfusionprotein:

For anyone else who was as puzzled by invisible zippers as I was (cut me some slack, I’m still a sewing baby), and for those of you who don’t have an invisible zipper foot, this video is ridiculously clear and helpful. Off to go make this skirt!

I could have used this last week! This is very helpful for those of you who are new to invisible zippers!


leafypeachy:

vicious-cosplay:

Since I posted this on a friends wall… I thought I’d share this with you.
This, and shopping in fashion districts, is literally how I afford to do the cosplays I do.

GETTING COUPONS

  1. Sign up for the mailing list to get the physical coupons
  2. Sign up for the e-mail list to get the email coupons
  3. Get the smartphone app for even more coupons
  4. Go to this site to get MORE coupons. This will give you another generic email coupon sometimes as well as the semi-broken mobile joanns app that has EVEN MORE coupons
  5. If you’re not buying fabric or sewing notations, bring Michaels and AC Moore coupons since you can use AS MANY as those that you can use since they accept all competitor coupons

THINGS ABOUT JO-ANN COUPONS

  • The mobile app for apple and droid give out different coupon codes
  • Mailer coupons (like the ones with your name on it), I’ve so far noticed, have unique codes per customer
  • E-mail coupons that are unique per customer if it has your name on the coupon (like mailer ones)
  • The derpy mobile Jo-Ann’s app has a different code than the apple/droid mobile Jo-Ann’s
  • If the code is different by 1 number, you can use both coupons in one purchase
  • All Michaels and AC Moore coupons (including mobile/digital) works on all Jo-Ann’s products other than sewing stuff

RULES OF THUMB

  • Jo-Anns runs 50% coupons during major holidays, two coupon commotions per year, and usually every 3 weeks otherwise
  • Looking for Casa Fabric? Wait for Prom, Easter, and Christmas
  • Casa Fabric I’ve noticed goes down to flat rate prices of 3.99-4.99/yrd three times a year. Want that 18/yrd fabric? Wait till its 4 bucks.
  • Looking for Brocade, Unique Fabrics or Patterns? Wait for Halloween
  • Brocade tends to go 50% off at least once every two months I’ve noticed
  • Looking for Fleece? Wait for Thanksgiving and Christmas
  • Blizzard Fleeces go on crazy sales around Black Friday, but it can be extremely hard to get it on those days so be weary
  • If your fabric is on sale this week for 30% off, and you have a 50% off coupon for the next two weeks, wait for the sale to drop and pick it up with a coupon
  • Patterns tend to go on sale for $1-2 every couple of weeks. It normally is a one day sale for a certain brand one week, and then a one day sale for another brand the week after. Stock up on patterns you think you may use (This is especially good around Halloween)
  • Unless you’re pressed for time, always wait for the 50% off sale or the 50% off coupon
  • Mobile and digital coupons are unlimited. If you’re not too far from your Jo-Ann’s you can make multiple trips
  • You are more likely to get a 50% off coupon to use on non sale fabric then you are to find it on sale for more than 30% off
  • If you’re shopping online and find the Teacher Discount code, you can use it without being a teacher! They can’t check online and thats an extra % off.

And my biggest rule for shopping at any craft store?

50% OFF OR BUST!

EDIT:

From Pancake Police

  1. 1. If you’re a student, sign up for the Student Discount Card! When you run out of coupons, it’s nice to have this extra bonus that takes 10% off of your purchase. I believe it’s good for sale items too?
  2. If you can’t find enough coupons from Joann’s, they’ll take competitor’s coupons too! (This is a little tricky— for fabric, they won’t take Michael’s or AC Moore’s because their competitors won’t sell it, but it’s good for beads, wire flowers, basically everything else. Hancock’s Fabric coupons should work for fabric, though!

From Srwar

  • Not all mailer coupons have different barcodes per person, only the 40/50% off ones on the back of the mailer are different. Anything inside the mailer will be the same coupon code and thus you can’t use duplicates on the same transaction.
  • Don’t be afraid to combine % off your total purchase coupons with % off items coupons. The % off your total purchase coupons will just come off of anything that the other coupons don’t apply to, including sale items
  • Be nice to your cashier and hand them your coupons in the order that they should be scanned! Highest percentage off individual items first, moving down, and any % off total purchase coupons last. It makes your transaction faster and gets you the best deal possible. 
  • Very occasionally, the notions wall and thread will all be 50% off, sometimes with a % off your total purchase coupon available simultaneously. Take advantage of these times and stock up on notions and thread! 25% off of notions already 50% off is nothing to sneeze at. (The last time this happened was New Year’s and I believe it happens at least one other time every year.)

Fantastic for those of you who have a Joanns nearby! We don’t have any here in the south 😥


luluko:

Welcome to the second installment of Cosplaying As An Organized Person! Last time I talked about storing fabric scraps. This time I’ll be discussing another big issue I have – storing my patterns nicely.

Before I begin, I want to say that I do feel a little silly making such long blog posts about these relatively easy ideas, but I am often very bad at explaining things because I tend to leave out details that are obvious or second-nature to me. These posts run long because I try my best to include as many little tips and tricks as possible so you’ll achieve the same success I have with my methods. Some things may be more obvious to a seasoned cosplayer, but not everyone has a ton of experience and I want to make sure everyone is taken care of!

Also, I took more pictures for this one because everyone likes pictures. 

Back when I was just a baby cosplayer eating paste in a corner, I bought my first pattern. It kind of broke my brain and my heart at the same time. I could hardly believe I paid sixteen dollars for an envelope full of paper. not even good paper. it tears so easily mom why do these cost so much??? Obviously, this was before I discovered the beauty that is pattern sales and coupons. Mom told me that if I just folded the pieces nicely and put them back in the envelope, I could use the pattern again and again.

image

image

I am a disgrace.

Read More


et cetera