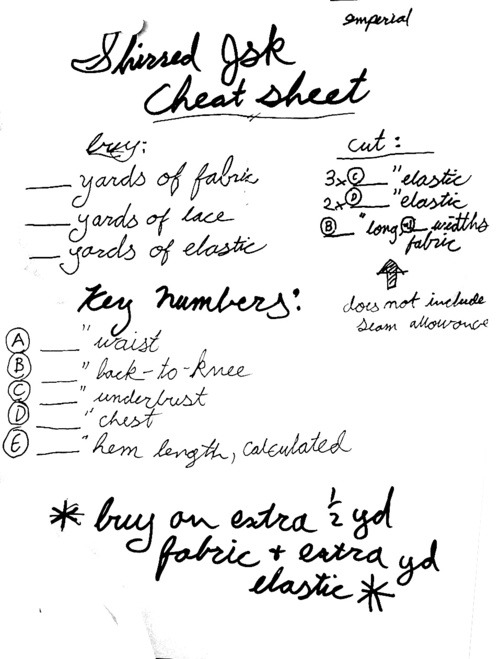
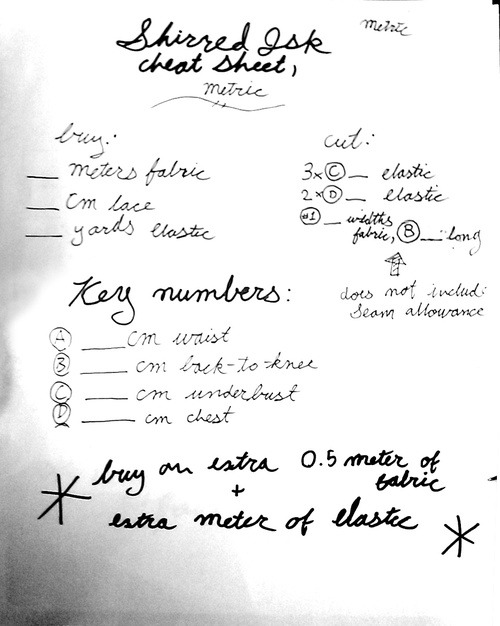
A lot of Lolita fashion is based on adding different finishing details to the same basic thing. For this reason, it’s very useful to have a folder of filled out cheat sheets so you can know exactly how much fabric to buy, without having to do math over and over again.
Here’s some for the shirred JSK, in both imperial and metric*
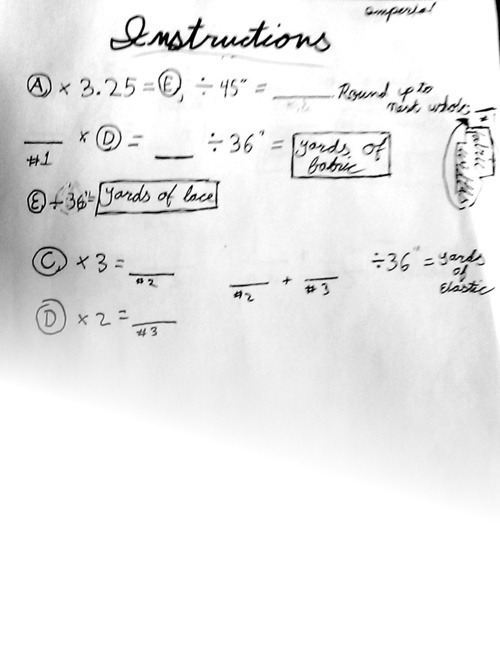
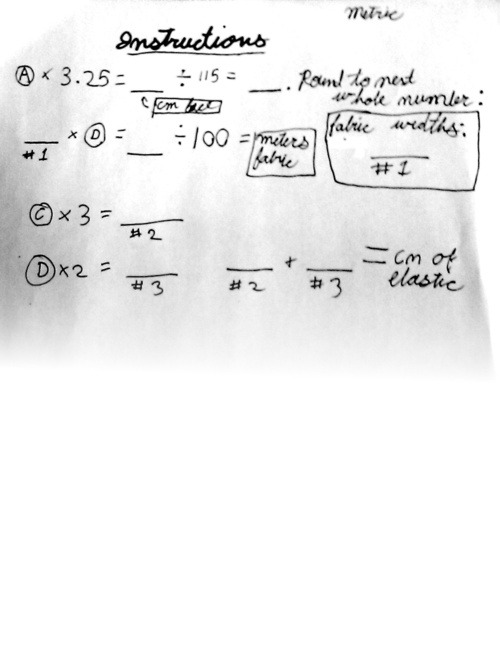
And instructions:
Apologies for the fact that these aren’t the most printer-friendly. Better scans are coming soon.
Since the Imperial instructions are kind of blurry:
(A) * 3.5 = (E) / 45” = ____, Round up to nearest whole number: <#1> [Fabric Widths]
The sheets are identical between the systems, except for a bit of formatting changing.
For those of you who are able to print your sheets out and understand it, go on ahead.
For those of you who like a little explaining:
Write down your key numbers (A) through (D). Measure your waist at your natural waist, the smallest part of your torso. Measure your back-to-knee by holding a tape measure at the back of your neck and having a friend measure the distance to the back of your knee. Your underbust is the area just under your boobs, where your bra band sits if you wear one. Your chest is around the fullest/largest part of your chest.
Multiply your waist by 3.25. 3.25 is the magic number to calculate Lolita skirts. The number you get is the number of inches/cm in your hemline If you want to get [Inches/cm of Hem Lace], get this many in/cm. Divide that number by 45in/115cm. A standard bolt of fabric is 45”/115cm wide. Round that up to the nearest whole number. If your number is only slightly over the number (2.1, 3.2, similar), you can round down. This number is how many rectangles of fabric you’ll need to cut out to sew end-to-end to make that distance around your skirt, or how many [Fabric Widths] you need. There’s a spot for that number on the sheet, under the “cut” category.
Multiply the number of fabric widths by your back-to-knee length. The back-to-knee length determines how long your JSK will be total. Multiplying that by fabric widths give you how many inches of 45”/115cm wide fabric you will need to buy. Divide by 36”/100cm to determine how many yards/metres you will need to buy. Write that down under [Yards/Meters of Fabric.]
The bodice of the dress will have five layers of elastic. Three of them will be the length of your underbust measurement, and two will be the length of your chest measurement. This avoids the dreaded Boob Loaf look. Multiply your underbust measurement by 3. Multiply your chest measurement by 2. Add those two numbers together. Divide by 36”/115cm to get [Yards/Meters of Elastic].
When you go buying, always get a little bit more than your measurements say. These calculations do not factor in seam allowance. When you go cutting, make sure to add a bit extra for that.
Now that you’ve got these numbers, go to the store/yard sales/fabric stash/estate sales/bedsheet section of Target and buy this:
Outside fabric of the JSK: your yard/meters of fabric number (plus extra). I’m using a unpatterned sheer fabric. You can use anything you like. Because this dress is lined, you can use a very lightweight fabric.
Lining fabric of the JSK: Same as outside. I chose a patterned quilting-weight cotton that shows through the outside.
1/4” (5mm or 6mm) or 3/8” (10mm) elastic: The number you calculated. If you’re smaller-chested, 1/4” is going to be fine. If you’re chestier (C-cup+) you might want 3/8”. You can also use a mix of the two widths (wider on the top and waistband for support). If you want elasticized fabric straps, get 2 2/3 /126 yards/cm more elastic.
If you want lace on the hem: Lace length your calculated. If you want lace on the hem and the neckline: Twice the length you calculated.
Other things you might want to buy: 1 1/3 /112 yards/cm ribbon, if you want ribbon instead of fabric straps. 1 1/3 /112 yards/cm lace if you would like lace edging on your fabric straps.
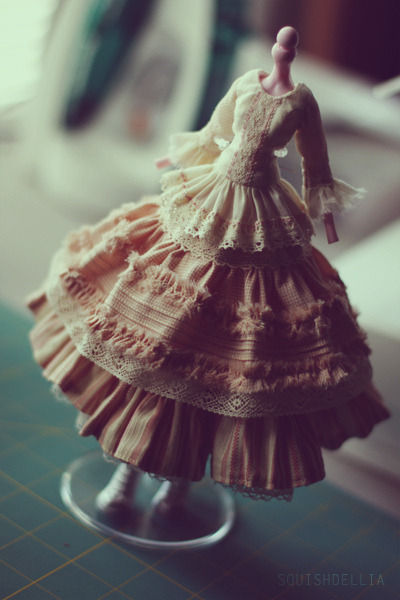
Well, that was technical, but in the next step we’ll actually have pictures and get to do some sewing.
_____
*I have never bought fabric somewhere that uses the metric system, so this might be off. Thankfully, for this particular project, it doesn’t matter if things are off by a bit.
There is a lot of weird and mysterious stuff in the “Notions” section at the fabric store. This is a new feature highlighting some of these items and explaining there purpose.
I use this fusible tape all the time! It’s amazing and is super useful.
This video is just a quick tutorial on how to finish edges when you don’t own/have access to a serger. I was doing it wrong for years before I learned this method, so I figure there’s a good chance someone else has been doing it wrong too.
Not everyone can afford a serger, but everyone can have nice, clean edges.
Here is a list of tutorials and patterns that I found while surfing the net. If you want to add your tutorial or if you found a fantastic pattern that should be on this list..please contact with me! 😀
My second question is, i have no knowledge about linings, facings, things like that. Where would you advise I start to learn about those things to upgrade my sewing skills?
Thank you so much for the kind words! We’re glad we can be figures to look up to, and we always hope we can help people get on our level (and beyond.) 🙂
Getting into Fire Emblem: Virtually everyone I know got into it from Awakening. It doesn’t require a knowledge of the lore but is a decent jumping point for it, aaaaand since most of the other games take place in independent universes, the lore isn’t the biggest deal anyway.
Leveling up your sewing: Read sewing blogs, especially ones that have no relation to cosplay. A lot of cosplay sewing is built on “quick and dirty” ways to do things rather than professional-umbrella skills, so the best knowledge is to go to the greater sewing community. (Here’s a list of curated blogs that are pretty alright; I don’t read them regularly anymore –– I’m mostly reading historical costuming blogs these days –– but there’s a good variety there. It’s a good way to be introduced to new techniques, and even if you don’t try them all out yourself, you at least know they exist and can come back to it later if you need it.
Fashion program textbooks are also a godsend, even if they can be pricey. Pattern Making for Fashion Design is a standard amongst many programs, and you can find older editions online for decent prices.
Youtube is good for quick things (installing zippers, doing a facing, etc) but always consult multiple sources. If you see a lot of conflicting information, something’s fishy.
Also: talk to people. Not necessarily in just a “leech other people’s brains” sort of way, just in a genuinely-interested “tell me about your work” sort of way. Many people freeze up when it comes to teaching other people, but they’re often delighted to explain their own work –– you can often learn just as much from that as by having them explain it to you.
Anon asked how to satin-stitch 90 and 45 degree angles while satin stitching, so I gave it a shot. I’m not actually that experienced at it, haha. Excuse the “uhhh” fumbling at times; it’s hard to explain something while doing it when I usually just… do it without even thinking hahaha.
Because bodies come in infinite variations and configurations and learning to tailor for them all is a massive undertaking, especially if you’re trying to fit yourself from commercial patterns.
You can make it easier on yourself by making your own blocks, though! These are essentially default patterns in a set size, which you can use to draft anything else from. So next time you make a pattern and get it to fit you, use it to develop a block you can use next time, cutting your patterning time by at least half.
(Christine and I have been waffling on making mine for eons lol.)
Sincerely,
Someone with an 11" difference between her bust and underbust