The Dragon plushie without feet! Because screw them!
Ahhh I need to get better with sewing darts, this head looks more suited for a dinosaur than a cute dragon
{29 May 2017}
smh the fabric I bought is fuzzy on BOTH SIDES! sigh After I’m done with the intended project for it I’m not sure what to do with it. I bought a little extra too because I was like “I can make stuff with it!” not that I needed a full yard to begin with.
Alice
Liddell was my first cosplay, I am really proud of how it turned out. Back then, I think it was 4 or 5 years ago, my mum helped me sewing the hard parts 😀
I
will make an own tutorial for the apron.
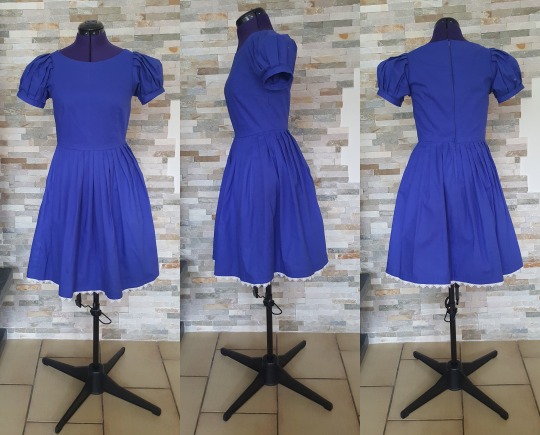
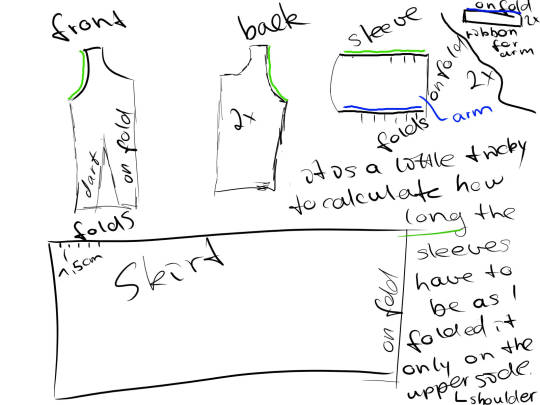
This
blue dress I sewed with a pattern I bought online
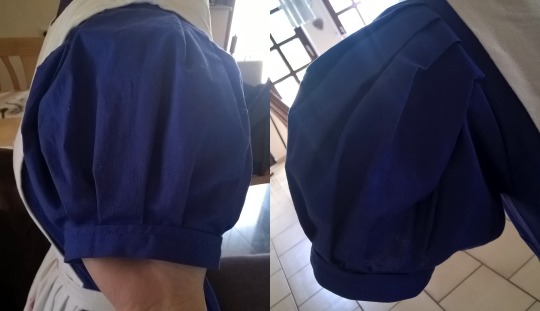
(the puffy sleeves
I improvised). I recommend to buy a pattern and change it to your wants because
it is a lot less effort.
When
you make your own pattern is it really useful to have a puppet so you
can pin your fabric onto it and mark the borders with chalk.
I
bought 2,5m blue cotton fabric and – how wide your fabric is, normally
114 or 140cm; lace ribbon.
Sewing:
At first you have to sew the dart then sew both back parts to the left
and right of the front. Then you have to fold the skirt, pin the
folds with needles and iron them. When you are ready, sew
with half of your seam allowance over the folds. Next sew the skirt
to your front and back and the lace ribbon to the bottom of the skirt.
After
that, pin the left side of the zipper to the left side of the dress
and the right side to the right. Before sewing the zipper to the
dress you have to sew the back seam of your skirt, up to where the zipper ends, together.
Then
fold both sides of the sleeves to the needed size, pin the folds, sew once over them and iron them.
You can also gather up the fabric.
Next fold and iron the
ribbon, that is around your arm in the end, once in the middle and sew
the edges together that you have a circle. Then sew the ribbon and the sleeve together.
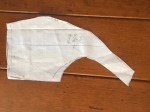
How I transfer from drape to parttern! (( this is not the only way or necessarily best way))
🔸1. Before you take the piece off the form LABEL EVERYTHING: what the piece is, lines to match everything up, all seam lines.
🔸2. Trim all the excess fabric to the seam lines.
🔸3. Pin to muslin and add seam allowance. Cut out.
🔸4. Use the muslin pieces to make a mockup. Try it on (and twirl ✨)
🔸5. Mark adjustments, remember to count in seam allowance.
🔸6. Seam rip and iron, add any additional allowances for linings/facings. Pin to fashion fabric and cut
🔸(optional: pin and trace the final mock up pattern piece to butcher paper for a paper pattern. (At this point I typically don’t do this because of time))
How to make custom lace appliques – the “Frankenlace” method
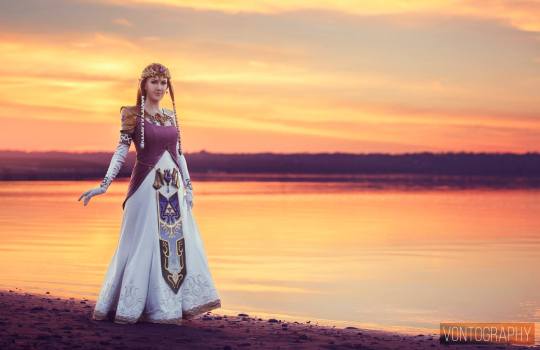
A lot of people asked for more info on how I made the appliques that decorate the bottom of Zelda’s gown. Here’s my tutorial for the whole process! This method can be used to make all kinds of applique shapes and designs if you get creative with it.
These lace appliques are made out of other lace – hence the nickname. To get started, you’ll need to collect a few lace trims to use as raw material. Look for styles that are similar or complement each other, because you’ll be combining them. This is some, but not all, of the trims I used. I bought these in the LA fabric district, but most are available at trimexpoonline.com.
Cut your lace down into smaller pieces that are more modular. Don’t cut up ALL your lace – this is just an experimentation stage, to practice rearranging the design.
Using a template of your desired shape (I made mine digitally, but you can hand draw one too) practice arranging your pieces until you find a design that suits your needs. This is not my final design in the picture – I went through several versions before I was totally happy with how it looked. You might discover that you need more lace, which is why planning and experimentation are so important. When you’re satisfied with how it looks, it’s time to start putting it all together.
You’ll need an embroidery hoop large enough to cover your whole template, plus some netting that is as close to transparent as you can find. Most generic tulle is NOT fine enough to do well with this technique – the holes are too large and the tulle stretches too much when handled. Look for netting that does not stretch or fray, if possible. Put some netting in your embroidery hoop, tightening the surface like a drum. I taped my template to a small sheet of masonite to give myself a portable work surface. I also ended up using clamps to hold the embroidery hoop to the masonite, but forgot to get a picture. This is optional, but really helps the design from shifting too much as you work.
Tools for the next step: fabric glue (other brands work too), a small paintbrush, and a water cup. I watered my glue down a little to make it easier to spread with the paintbrush. Be careful not to add TOO much water, or your glue will be too thin, not grip well, and take a long time to dry.
Working in small sections, begin gluing your lace pieces onto the netting. Start at the center and work outward, if possible. Continue until all your lace pieces are glued onto the netting.
Here’s what mine looked like with all the lace attached! At this point, I flipped the embroidery hoop over and applied a second coat of glue over the entire back of the work. The netting is so thin that you can continue to apply more glue from the backside to get a more secure grip.
Optional: add rhinestones to taste. I used E6000 for this step. Not every applique requires rhinestones, but in this case I wanted Zelda to sparkle as much as possible.
Repeat to create as many appliques as you need! Zelda has 8 along the bottom of her dress. Here’s part of my assembly line.
When you’re ready to attach the applique to your fashion fabric, trim away some of the netting along the outside, but leave any “interior” portions that help stabilize the design. I simply glued my appliques onto the silk, but I later went back and hand-stitched them down for a more secure hold. After they are properly attached to your fabric, you can VERY CAREFULLY trim away the “interior” pockets of plain netting using small scissors.
The final look of my gown, after all the appliques and trim were attached.
This method is very time consuming and requires a lot of patience and concentration – but I just love the results! I wanted to achieve the look of professionally-made applique, but without access to industrial equipment, this was the next best thing I could come up with.
The white-on-white effect is subtle, but matches the look I was going for. Photo by Vontography.
I hope this is helpful to some of you in your own costume projects. Let me know if you have any questions, and good luck!
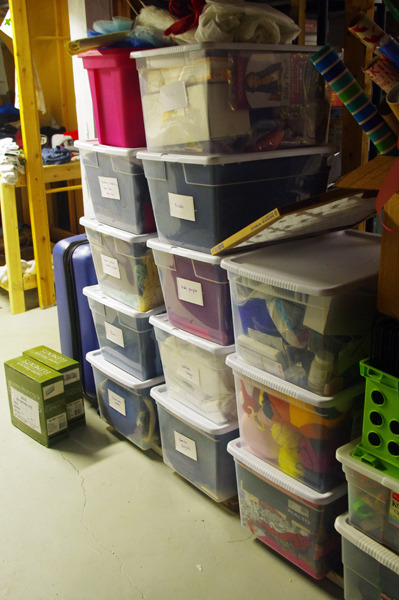
If you are like most crafters, the longer you have a sewing-related hobby the larger your stash of fabric will get. (If you sew and you don’t have a fabric stash, I am officially afraid of you and your merciless resolve.) I’ve been cosplaying for about eight years and sewing for longer than that, so the amount of fabric I want to hold onto because I might use it someday is… really extreme.
What I ended up having to do to get my fabric stash under control was catalog it, put it into bins, and get it out of my actual craft room. I need to pull something from my stash maybe a couple times a month at most. It doesn’t make a lot of sense to keep that stuff in my primary working area when it gets used that infrequently, so I keep it my basement. You might not have a basement you can store stuff in, but everyone’s got corners of closets or other less readily accessible areas where stuff for long-term storage is asking to go. A catalog of what you have allows you to utilize those spaces more effectively.
This is the binder I made up, which 1) allows me to check what’s in the basement without having to actually go to the basement, and 2) is way easier to flip through than a pile of fabric that I have to re-fold because I messed it up while pawing through it.
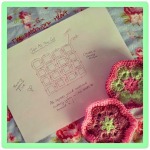
If you’d like to use my templates, they’re over here! My goal in making them was to not overwhelm myself with information because I had a ton of fabrics to catalog and I didn’t want it to take forever. The sheets are made to record a few pieces of information:
A fabric swatch. I made two template sheets, one with the swatch space on the left and one with the swatch space on the right, so the stacked pages wouldn’t be super uneven.
A brief description and enough room to note anything special about the fabric.
A super rough ballpark of how much yardage I have.
Did I ever cut anything out of this fabric before, or is it still basically in a rectangle? Helpful for knowing if your fabric looks like swiss cheese or not.
And that’s it. You can add more or less information based on what you think is important, but that’s enough for me to go off of. And here’s the organized stash itself, more or less:
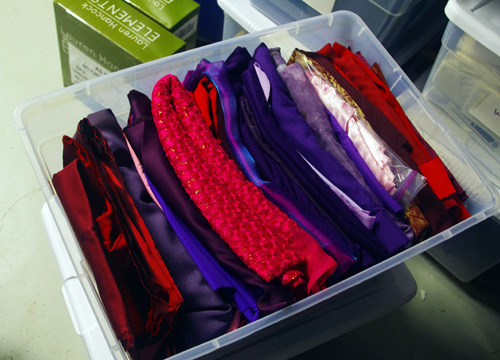
Another tip in organizing your storage bins: if you make it so all the edges of your fabrics are visible when you take the top off your bin, it’ll be easier to find things and take them out. While I was loading the bins, I set them on one side and stacked my fabric up in a pile. (The end result is the same thing as Konmari vertical clothes folding!)