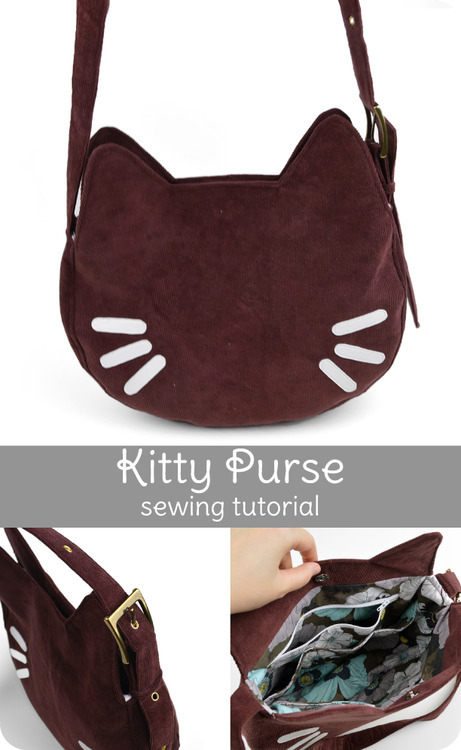
New free pattern on the blog today! Make a sweet and simple kitty purse with loads of inner pockets.
This project came about because I realized I needed a purse that was a little more suitable for professional occasions, so I thought I would try making up a cute pattern that was also a little subtle. I’m not quite sure if I got exactly to that mix of professional with subtle cute, but it was fun trying nonetheless! Instead I think I ended up with a purse that’s just a bit subtle; maybe good for…
{28 October 2014}
Freebie Friday! Kitty Purse
I’m pretty sure I leveled up in sewing with doing that skirt. I also realized how to hell to use the zig-zag stitch to prevent fabric from fraying. YOU OVERLOCK WITH IT! Nothing that I have ever read has explained how to use the zig-zag to do that. Man…. like, it’s a fraying fabric, really important that it doesnt unravel, but doing it the normal way doesn’t really stop it. SO YOU HAVE HALF THE ZIG ZAG GO OFF THE FABRIC!
I was lucky with this skirt that that there were only two places where there was raw exposed fraying section, because I managed to use the salvage edges on the side seams and don’t need to worry about that fraying. but the waist band and pocket would have frayed like crazy. BUT I GOT IT. IT’LL BE FINE!


Skirt is done! Pretty happy. Its about 2" bigger than I wanted, but its okay, it just won’t fit at my natural waist. The pocket is waaay lower than what is ideal, but its a pocket!
The zipper is in! first time installing one, and I’d say it was pretty successful. Is it the prettiest one? No, but it functions and is mostly hidden, and that’s really the best outcome I could have hoped for.
Now to try and hem this bottom….

I noticed there aren’t a lot of good stencils or tutorials on capes.
Here’s my tip on how to make use of huge pieces of fabric so you can reuse it later for smaller pieces and still use it as a cape.
Also, WIP on my 2P!Prussia cosplay.
{22 October 2014}
Stretch Your Skills: How to Hem Knit Fabric Five Different Ways
Hemming knits is often the trickiest part because you need to make sure the openings to your garment stay stretchy enough to pull on and off your body. This post demonstrates five different ways to hem knit fabrics, so they will not become wavy and distorted and are less likely to have threads snap when the fabric is stretched.
Stretch Your Skills: How to Hem Knit Fabric Five Different Ways


My 1840’s Bonnet Hack
I started off with a $5, 18” straw craft hat and scraps of related trim and fabric from my stash. I purchased straw trim (which will be returned), a few flowers and ribbon.
18” was too large so I seam ripped and unwound the straw band until it was more manageable. Folding the hat into a bonnet shape gave me a cutting line, which was covered with the removed row of straw. I only stitched the straw band to the exterior, the interior was finished after the lining was done.
The flat hat was dipped into a pot of just boiled water, making it pliable. I could stretch, fold, and adjust the shape as needed knowing the shape would hold once dry. NOTE: The fumes given off from the treated straw aren’t healthy, so do this in a well ventilated area.
Scrap strips of silk were ruched, pleated, and stitched into placed by machine for the interior lining.
The exterior trim is about 5 yards of ribbon with a couple flowers. The back ruffle is made by stitching pieces of the ribbon together (I looked at a lot of extant bonnet photos).
{21 October 2014}
How to make a circle skirt without a pattern
I have successfully sewn a pocket into this skirt. The only thing I would chance about it I would have liked it to be up a few inches higher. (I decided to NOT ignore the instructions) Granted, I still need to sew the band and other seam (where the zipper will go) but I have a pocket!

Sushy tries crocheting.
I learned crochet first, and trying to do knitting now…. I think crochet is so much easier to handle
