Okay, I know I’ve been really slacking on the “one pattern a week” thing, but I went and got the fabric I need for the next one, and going to start that probably next week, since this weekend seems like it will be a bit mess schedule wise.
{9 May 2014}
So far on Simplicity 4803
I got a lot further on the skirt than I thought I would. I didn’t follow the instructions very well, and sewn all three pieces of the overskirt together before sewing the skirt in a circle. O think that’s the order they wanted… I don’t really know. Reading the instructions are a bit confusing.
I need to male the elastic band smaller for sure. I also feel like the skirt may be a bit large overall, so I’ll double check the measurement sheet.
I had also cut out the one print and asymmetrical specific piece out wrong. Luckily I had enough left over I could recut it.
{8 May 2014}
Sewing Goal 5/8
- Finish the hem on the black portion of the skirt
- trace and cut out the printed over skirt
- At least start the hemming on that.
Why do I keep wanting to make skirts that require a curved blind hem on them? I can barely do a straight hem
{6 May 2014}
About the sewing journal
I had previously talked about making a sewing journal. I went through all the patterns I have, and picked out a handful that I wanted to do based on how easy it looked, and if it was something I wanted to wear almost as soon as I make it.
I have a section for projects in the journal, so I wrote them down, and which one of the pattern I was going to do, because I tend to forget which one I decided.
I plan on doing:
- Simplicity 2277 C, D or E
- Simplicity 2449 C or A
- McCalls 5050 A or D or E
- Butterick 4803 A
- Simplicity 3750 A or B
- Butterick 6031 D, C and A
- Simplicity 1873 C or A
- Simplicity 2412
- Simplicity 1551
I have them numbered in a “I want to do them in this order” but so far I haven’t been really sticking to it, as I’m going to do #4 first, but it’s a general suggestion to help decide which one to do next.
On the few pages, I wrote down the supplies I would need for the first few projects, so when I go to the store, I have it on me. The notebook is small enough that it can always be in my purse, so I won’t leave home without it. Who knows when you’ll run across something or be somewhere to get what you need, but you just can’t remember how much of what!
More on the journal: On the very front page, I’ve written my measurements in pencil so I have them on hand when I’m looking up sizing on the pattern charts. I have both CM and IN written down, because I also frequently look up clothing that is listed in cm. After that, I have about 5 pages dedicated to what patterns I own. I don’t always remember what I have bought. I tried to keep them somewhat numerical order. They are also divided based on the maker.
After that I sectioned off about 13 pages to write what is currently in my stash; the yardage, weight and material (if I know that) pattern and colors of the pieces. If I know something is meant for a pattern, I’ll also note it there. I haven’t actually done this part yet, but I plan to set it up as:
Color and Pattern of Fabric
Yardage; note if it’s 45", 60", etc, and if been cut into or not. Weight and material type, and then if I have a specific pattern or a general thing I want to do with it, like a skirt or shirt, or dog bed.
I’m not sure how nice and clean the project section will stay. Besides the list of materials, I also want to note any challenges and things I came across working on said pattern. I imagine it’ll get messy really fast, and things will get lost between the notes and lists, but it’ll all be there. I may need a little bookmark in it so I know how far in it I am haha
{6 May 2014}
Honestly WTF: DIY Lace Shorts
DIY Lace Shorts
A few weeks ago, our friend Katie showed up wearing the cutest lace trimmed shorts. We were impressed to discover that not only did she DIY them, she made them using boxer shorts! We immediately raced to Target for white boxer shorts and the fabric store for a variety of pretty white lace trims. Honestly, this DIY is so simple and perfect for summer!

You’ll need:
- men’s or boy’s white boxer shorts
- 2 yards of lace trim
- a pair of scissors
- pins
- a sewing machine or needle and thread

Pin the lace trim along the inside hem of the shorts, starting at the seam of the inner leg. If the trim has a decorative top edge, it can be stitched to the outside of the boxer. Trim away any excess. Sew or hand stitch the lace to the boxers. Sewing over the original hem gives it a nice and clean look.

And you’re done! Can you believe it’s that easy? The possibilities are endless – you can try using silk boxers or black lace on black boxers!

Wear them as is or layered under skirts. Have fun!

(top image from Tumblr, rest of images by Honestly…WTF)
{6 May 2014}
Where do you get your fabrics?
Hi Anon!
I wish I could answer this better for you, but we get fabric from everywhere. When we go into the store it’s usually JoAnn’s because there are several nearby. We also check Hobby Lobby sometimes but they have a bit of a weird selection. 🙂 Hopefully we’ll get a chance to head down to a fabric warehouse near Chicago that I know about because we need some really specialized fabrics for some of our next projects!
MOST of our fabric shopping happens online though – It’s much easier to get the color/weight you want in my opinion. We’re addicted to swatches so that we can see and touch the fabric before ordering yards and yards of it, so unless it’s a last minute costume, we do some shopping around. 🙂
Here are a few of the pages we’ve bought fabric from/gotten swatches/maybe I was just looking at things there and we didn’t actually buy anything but I would in the future given the opportunity:
http://www.warehousefabricsinc.com/
Also Ebay, Amazon, and Etsy have a lot of unique fabrics, too! Don’t count them out!
I hope this kinda helped? We’re kinda all over the board for fabric shopping. 🙂
{6 May 2014}
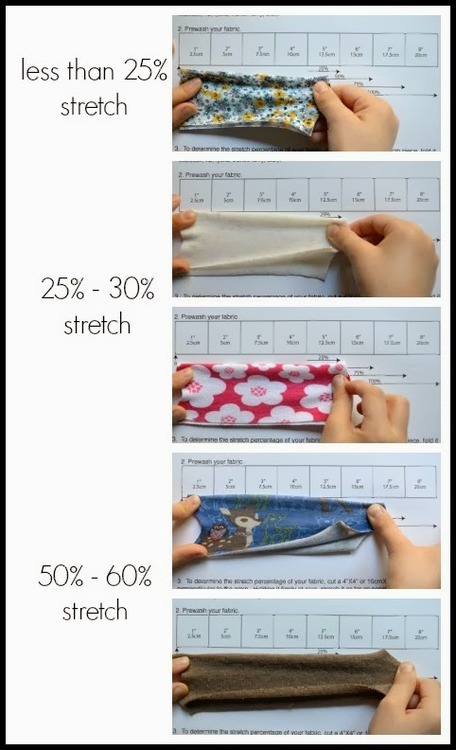
Tips for sewing knit

Cosplayers, I need a bit of helpful advice.
Whenever I’ve worn my Marluxia wig it starts out fine. (Pic1) but then it drifts back and I end up having to either pull it down or re-situate it on my head. (pic2)
My hair’s pretty thick and as such the pony tail ends up a giant ball at the base of my head. Do you guys have any tips on how to make sure that the wig stays in one spot? The wig does have adjustable straps to make it tighter but I don’t know if that’ll cause me to have a headache from it being so tight it causes lack of blood to the brain.
Also, can someone recommend me some nice comfortable way to make Organization 13 boots?
Hi Cattai!
Long response incoming – I can’t help it because I see SO many people having trouble with wigs!
How to wear a wig:
* Step 1: Get your hair as flat as possible. If you have shorter hair, you can leave it down or put it into little ponytails and pin them down. If you have long hair (like me, I have so much hair!) I recommend either FRENCH BRAIDING your hair and then wrapping the braids around your head (so it is spread out and not in one giant ball like if you put it into a bun/ponytail) or putting your hair into PIN CURLS for the day.
* Step 2: GET A WIG CAP. GET A WIG CAP. GET 10,000 WIG CAPS BECAUSE YOU WILL LOSE THEM ALL. Wearing a wig cap not only smooths down your head, it will also give the pins something to hold onto in the next steps! 🙂 Here’s a picture tutorial on how to put a wig cap on! And here is a tutorial on making a wig cap out of nylons if you forget yours! 🙂 I strongly recommend PINNING the wig cap to your head. Just like the wig, it can start to slip around during the day. You can either use bobby pins/hair pins or snap clips to do this, just get it attached to your hair! 🙂 (Taeliac’s Tutorial is great 🙂 )
* Step 3: Put on the wig! Adjust the straps so that it is comfortable (not loose OR tight – these straps are to make the wig FIT YOUR HEAD not to keep it from slipping or sliding. Next, take some bobby pins or hair pins (I’ve heard hair pins are better but we usually end up buying bobby pins before each con ^^; ) and PIN THE WIG TO YOUR HEAD – with each pin, try to grab some of the wig cap and your own hair. You can see what works for you, but we usually end up with a lot of pins around the edges of the wig and a few scattered throughout, depending. 🙂
* Step 4: This should keep MOST wigs on (and should definitely be enough for Marluxia’s wig.) For ridiculously wigs that have heavy structures/buns/pigtails/etc you may need to get some toupee clips to sew to the front of the hairline (Arda sells them now! ) (How to sew them in) – These snap into your hair and are sturdier than bobby pins/hair clips at holding the wig in place. You can also use toupee tape (there are other brands, that’s just the first one that came up on a quick search. 🙂 ) which is the wig equivalent of fashion tape for holding your clothes to your skin. Again – these aren’t necessary for every wig – only for ridiculous/heavy wigs or sometimes for lace fronts since they can be hidden better than bobby pins.
Here is And Sewing is Half the Battle’s tutorial covering a lot of the same points. 🙂
I hope this helped some!
Good luck on your cosplay!!! 😀
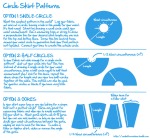
We’ve gotten a few asks about how to pattern circle skirts, especially out of rectangular cuts of fabric. Circle skirts (and circle cloaks!) are great for beginners, so here are the steps we use!
