Cut pieces is difficult when the cat feels entitled to your fabric. A box is not even appealing enough
Cut pieces is difficult when the cat feels entitled to your fabric. A box is not even appealing enough


Here’s a quick, super easy pattern for Yoko’s scarf, if you’d like to make it yourself and are also partial to knitting. 🙂
Supplies needed:
Size 8 Knitting Needles
Size “G” Crochet hook
1 Skein Red yarn
1 Skein White yarn
1 Skein light pink yarn
This pattern uses a 4ply, worsted weight acrylic yarn.
Gauge 4sts= approximately 1”
This pattern is made to accomodate a ribbed stitch
Row 1:
Cast on 70 sts with pink yarn. If you would like to modify this, make sure that the number is even.
Row 2-19
K1P1 until end of row. Repeat.
Row 20-24
K1P1, then switch to red yarn, and continue the K1P1 pattern to the end of the row
Row 25-40
K1P1, switch to white yarn, and continue the K1P1 pattern to the end of the row
Row 41-45
K1P1, change to red yarn, continue K1P1 pattern to the end of the row
Row 46-71
K1P1, change to pink yarn, continue k1P1 pattern to the end of the row
Row 71-75
K1P1, change to red yarn, continue K1 P1 pattern to the end of the row
Row 76-91
K1P1, change to white yarn, continue K1P1 pattern to end of the row
Row 92-96
K1P1, change to red yarn, continue K1 P1 pattern to the end of the row
Row 97-114
K1P1, then switch to pink yarn, and continue the K1P1 pattern to the end of the row
Row 115-119
K1P1, change to red yarn, continue K1 P1 pattern to the end of the row
Cast off
Take crochet hook, and an extra piece of yarn, and crochet the two ends together. Cut or Tuck in excess strings with a crochet hook
Someone asked that this be rebloggable so HURR YOU GO
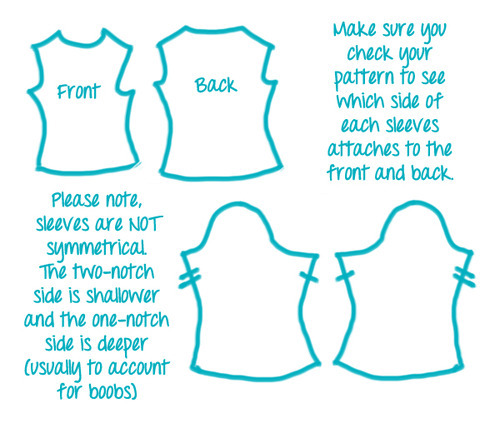
Some patterns are really dumb in telling you to finish the body of an outfit, then finish the sleeve, then attach a circle to a circle. It’s possible to do, and once in a while it’s necessary, don’t get me wrong, but unless you have a lot of experience it’s sometimes very aggravating trying to evenly distribute the sleeve around the “hole” cut out for it and match up the seams under the armpit!
(Please note…some patterns, especially to achieve tailored looks, require you to do it the traditional way. Don’t use this method for fashion school assignments or super-complex garments as it will probably screw up the way it ends up fitting in the end. This is mostly for the use of cosplayers to make their job a little easier.)EDIT:// thevvioletprince, a fashion student, says she’s been taught this method in school so HAVE FUN, NEVER MIND
EDIT DEUX:// If you are doing a traditional garment of some kind, for instance, something that has a multi-piece sleeve or that requires gathers, you may need to do it the “old-fashioned way”!
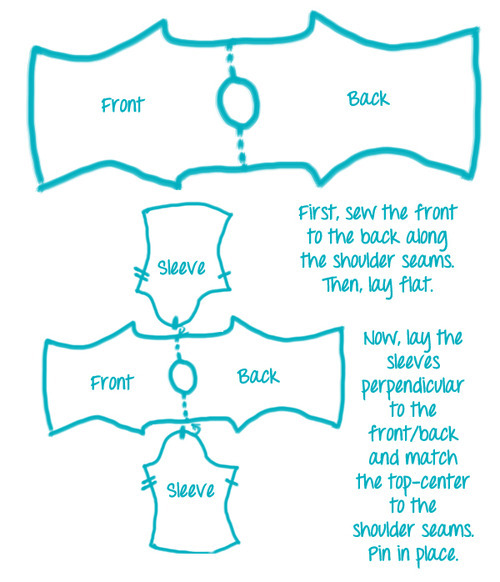
ANYWAY SO THIS IS WHAT I DO.
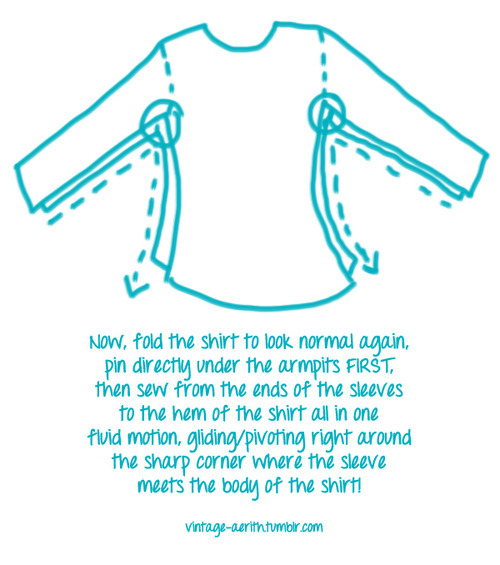
PLEASE DO NOT REMOVE SOURCE OR REPOST, THANK YOU
I’ve bought a walking foot and a pintuck foot for the singer. I really want to start these bloomers, but they are kinda stretchy material, so I’m going to wait until the foot gets here to start sewing on them.
I also need to find a good way to get seams on very fraying fabric to stop doing that. Without a serger.
This also means I can get back to making myself thigh high socks again and maybe actually done well. Besides everything else I want to make from jersey fabric
This post will be a bit shorter than the other one since it only covers sewing the skirt! There are other ways to sew a pleated skirt, but the way I sew mine allows me to conceal the zipper inside of a pleat fold so the skirt looks smooth all the way around.
how to sew a pleated skirt with a concealed zipper and a lapped waistband using your own measurements
*IMPORTANT* If you got here from Google, thanks for reading! I hope this tutorial helps you. If you have any questions regarding this tutorial, please read my FAQ page first before sending me any questions. Half the time you’ll find the answer to your question faster than if you wait for my response. Thanks!
» MATERIALS GUIDE «
BONUS POST: How to draft the collar/facing
Hi! Some lovely anons asked me how I make my sailor uniforms for my DR costumes, so I decided to finally make a post about it! For reference, I use patterns from two Japanese sewing books: Cosmode’s 仮想衣装 and すぐに作れるcos衣装. The latter has a fitted seifuku pattern that I use for all of my Danganronpa costumes in order to achieve the flared effect around the hips! I pattern my own pleated skirts, which I’ll explain in the next post.
!IMPORTANT! Before you ask me where to buy these books, read this post about Japanese patterns! They’re not beginner friendly at all and I can’t recommend them to anyone who isn’t reasonably advanced at sewing, so buy at your own risk!
I can’t promise I’ll be able to explain everything relevant since I’m assuming basic sewing and pattern knowledge in order to keep this as brief as possible, so please send me an ask if you have any further questions! If you have any character-specific questions, feel free to send me an ask as well!
Also, as a fair warning, I use a fair amount of tools that people might not have on hand, such as a rotary cutter. I include suggestions on how to get the same outcome without those tools, but I can’t promise it’ll be as neat or look the same.
how to sew a sailor uniform top with a side zipper


If you liked this tutorial, please check out my Facebook page for more of my work!
You can also adjust this tutorial to work with invisible zippers or to make the zipper more or less noticeable by adjusting the garment edge during the pinning phase to completely enclose the zipper or to show more of the zipper.
http://www.facebook.com/LadyCels
Larger Size available on my DeviantArt.