
Its like 2” too big. Idk how. Am I that bad at measuring myself? I’m not a fan of how long it is either ah well
the skirt is done~ The bow is mostly done; I just don’t have a pin I can put it on though.
Its like 2” too big. Idk how. Am I that bad at measuring myself? I’m not a fan of how long it is either ah well
the skirt is done~ The bow is mostly done; I just don’t have a pin I can put it on though.
I added the seam allowance to the pattern, and ct out the paper, and then went to trace it, and discovered that my fabric isn’t wide enough! Whooppppsss. I’m still going to go through with the same fabric, but I’m going to adjust the pleats to make it fit and work.
I’ve also realized I forgot how to add in a pocket, so right now I’m fixing that problem I made.
Did a test with gathering. I did not use ideal fabric/needle. It was knit and I had a sharp non-ballpoint needle in, and I wonder if those effected my results.
Anyway, I tested the gather technique and ratio of tier to tier. I tried tier differences of:
All tiers were 5" high.
I didn’t complete all tier differences, because I didn’t like the feel that anything below ½ gathering felt. (like tier 1 is 10", the next is 20", etc) This might change if the total length of the fabric is greater than my small sizing (numbers ranged from 6" to 20")
I also found that, with this ½ difference, the curve on subsequent tiers become very great. The final piece ended up three tiers, 5, 10 and 20 inches long each. The hem of tier 3 had a great curve to it. I thin this is why the original skirt has each tier slightly shorter than the one above it. (like tier 1 is 6", the next is 5", etc)
Gathering method I used was the zig-zag and floss method. I used embroidery floss since I couldn’t find dental floss quick enough. This technique works pretty well.
Other challenges:
When sewing the tiers together, the sewing foot kept getting stuck and flattening my gathering. This may attributed to the fabric and needle type. Proposed fixes if the fabric/needle combo is not the fix:
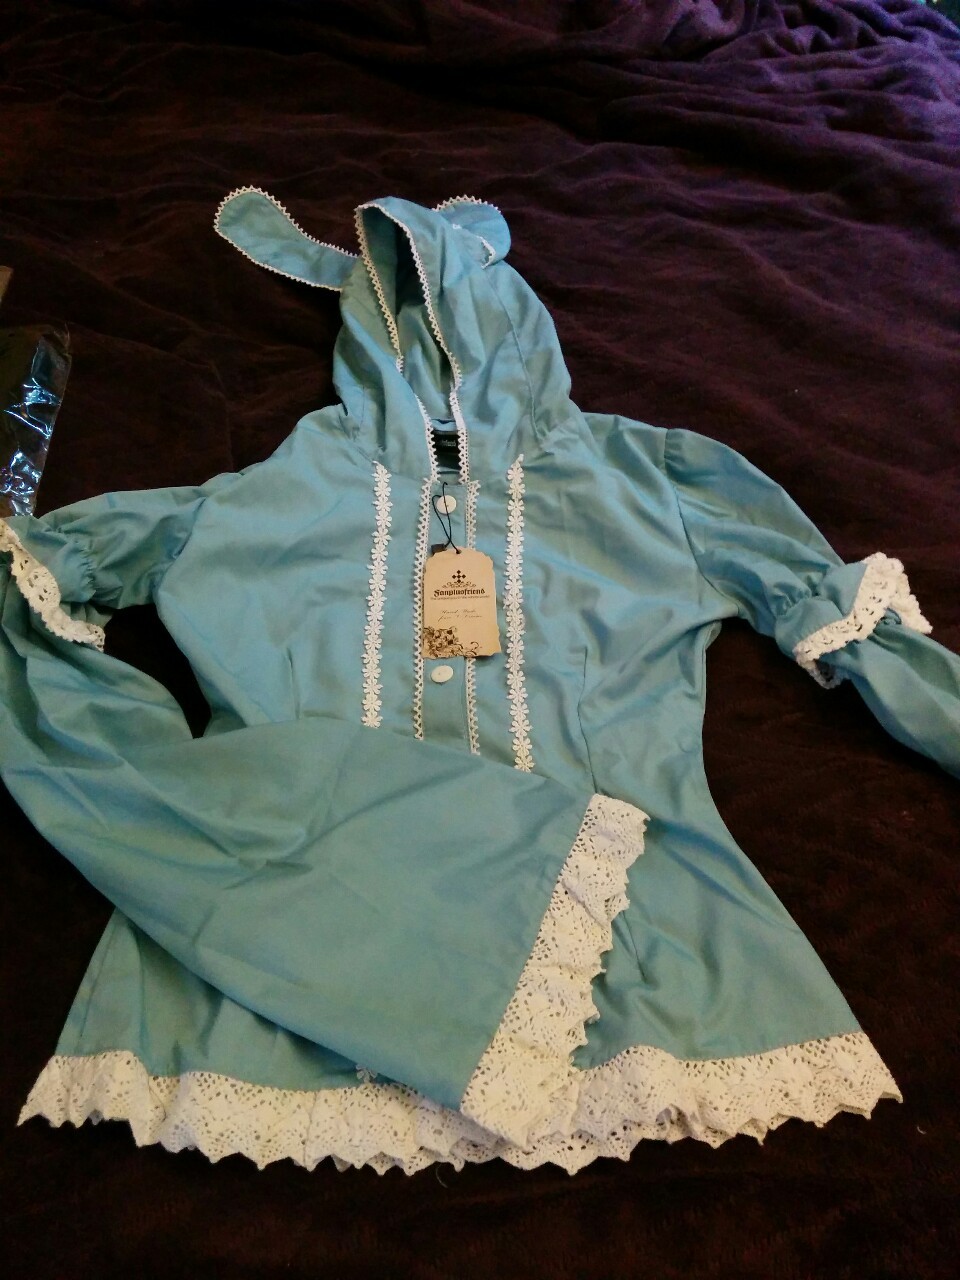
So I have this cute blue F+F Jacket I got in their LP bag, but it’s way too small for me. It’s so adorable, that I decided I wanted to make my own that fit.
I’ve never made my own drafted pattern before (the circle skirt doesn’t count) so I tried winging it and I had not a clue what I was doing. I still don’t understand the construction lines enough to manipulate then raw like that.
So I dug though my box of patterns, and found a button up shirt that looks like I can alter pretty easily to do what I want. (I think what I just really need is the bodice part, the sleeves I think I can do on my own)
The though part though, is that my hips flair out to like 2 -3 sizes LARGER than my bust on each and every pattern I want to do ever. Hopefully I can just crop it right before it gets to the point, and it fits fine, or I need to figure out how to alter them to flair out from the waist to hip to get it to fit.
I’m going to be altering a McCall’s 5138 for this. Wish me luck!
If you have thigh-high stockings but don’t have garter-belt or anything else to keep them up, try using athletic tape. It’s a few dollars and relatively painless to take off, I used some to hold a pair of stockings due to my lack of good pantyhose and went through both a job interview and dentist appointment with little issue.
Now I have not tested whether it can hold for several hours and excessive movement may mess it up but it’s easily replaceable and will hold for at least 2 hours on pretty good-sized thighs so I’d recommend trying it!
If you want to try it then please follow these instructions:
Warning: Don’t wrap the tape tightly, you don’t want to risk bruising or messing with your blood system. Although I suspect it’d be pretty difficult to do so with this kind of tape, especially if you follow the instructions to the letter.
1. Put the stockings on all the way, look at where the top 1-2 inches sit and bring the stockings down 2-3 inches. Loop tape around your thigh at the height the stockings would sit with the sticky side down.
2. Once the tape is all around your thigh, put your finger on the overlap and loop the tape the reverse direction so this time the sticky side is on top. Don’t twist it!
3. Once the second layer is looped around your thigh, cut it. Depending on the kind of tape you got, this might require scissors or you may be able to tear it with your hands.
4. Pull the stockings back up and line up the top of the stockings and the sticky 2nd layer of tape. Make sure everything is smooth.
5. Assuming that the very top of the stockings will be covered by clothing, loop another layer of tape sticky side down on the top ½-1 inch of the stockings so it’s half on your skin and half on the stocking. This should keep it in place.
6. Now if you’re wearing clothes that wouldn’t cover the very top of the stockings, then I would suggest using tape for the third layer that is the same color as the stockings so it blends in. If that is not an option then skip the 3rd layer and bring extra tape or alternatively tuck the top edge of the stockings into the tape.
Now if you’re looking for thigh-highs or want to know what kind I had tested this trick on, here’s a link
Warning: The site is NSFW (although not porn) as is the image used to show off the stockings but it’s not full-nudity, just lot of leg and a good deal of butt.
http://www.babeland.com/sheer-back-seam-thigh-high-stockings-/d/3758_c_178
Now other kinds of tape can work for this, for instance double-sided fashion tape is a good choice, so keep that in mind and if possible try to figure out what works best for you and research what other cosplayers do.
Have a wonderful day/afternoon/night!


How to make a screen print shirt fairly easily:
- Print or draw a design on sticker paper. Cut out the parts of the design that you want to be on the shirt. This part takes the longest and will vary the difficulty based on the design. Small scissors and an x-acto knife are the way to go. Be careful not to lose any loose pieces.
- Peal off the backing and apply to the shirt. It’s a good idea to figure out your placement beforehand. Make sure all the pieces are firmly adhered.
- Use screen print or fabric paint and paint over the sticker stencil.
- Let the paint dry overnight or as long as the paint specifies.
- Peel off the sticker stencil. Mine had some paint leek spots, but I don’t mind it. If you are worried about it, take care around the edges to not over paint. Any thin lines of stencil will be most like to “fail,” but just think of all the imperfect “vintage” t-shirts. Little imperfections add character.
- Follow any pressing/washing instructions for your paint and enjoy your new shirt!

A Visual Dictionary of Tops
More Visual Glossaries (for Her): Backpacks / Bags / Bra Types / Hats / Belt knots / Coats / Collars / Darts / Dress Shapes / Dress Silhouettes / Eyeglass frames / Eyeliner Strokes / Hangers / Harem Pants / Heels / Nail shapes / Necklaces / Necklines / Puffy Sleeves / Shoes / Shorts / Silhouettes / Skirts / Tartans / Vintage Hats / Waistlines / Wool


I’ve had to do this so much, so I figured it would make for a nice helpful tutorial. For this tutorial I (finally) sized down my 2XL Katharsis shirt to a size small in this tutorial and for all my metric friends, half an inch is 1.27cm (2 cm is fine).
A list of random tips to aid you in sewing or keeping some things organized.
Prevent Color Bleeding
Use half a cup of vinegar or a cup of salt to the water before adding clothes or detergent. This will help keep dyes from bleeding out.
A sewing gauge is a good quick way to measure common small measurements. The Dritz Measuring Gauge 14 is double sided and you’ll have no worries about it slipping or losing the measurement.
Organizing projects
Use hangers with clips to organize in progress works. Keep all the fabric and patterns right there and easy to see. Use a small plastic bag to keep all the notions and other items with it.
Organizing Buttons
A fishing tackle box is great for organizing buttons and other small notions that you have a lot of and get easily jumbled.
Making tissue patterns more durable
Use cheap iron-on interfacing on the paper pattern pieces – great if you’ll be needing to use them a lot and makes it sturdier for handling alterations.
Pattern Storage
Take a large manila envelope and either make a copy or cut and paste the front and back of the pattern to the outside of the envelope. No longer have to struggle to put the patterns back into those small packages. Can easily be stored in a cabinet.
Fabric Index
Cut a small (2"x2")piece of fabric, and attach it to a piece of cardstock (like an index card, or cut some of your own up). Write down the important information of the fabric; material content, how many yards you have, where you bought it, care, etc. You can then sort the cards however you want, and store it in a binder, box or whatever you prefer. Quickly go through the cards and see what you got without going all through your stash!
Remembering what Foot does What
use a plastic boxes with little compartments and keep your feet in there with a little guide for each foot, like what it’s used for and recommend settings (and which machine it’s for if you have multiple!)
Proper pin use:
Use the proper pin for the right type of fabric.
Silk pins are ultra sharp and wont snag the delicate fabrics.
All-purpose pins are still sharp, but best used on medium weight fabrics and aren’t so delicate that they bend easy.
Quilting Pins: they have a longer shaft to easily handle going through several layers of fabric.
Forked Pins: It has two prongs, which is great for 4 way joints, and matching seams up perfectly.
Prevent Zipper Buckling
Use some lightweight fusible interfacing on the edges of the fabric where the zipper will be installed.
Cheap Seam Guide
A package of stick-it notes placed where the seam allowance is on the machine can help get an accurate top stitch without any special equipment. Peel the bottom piece off to expose the next piece and use it to secure it into place.
Basting with Glue
You can use non-toxic washable glue sticks to help baste tricky hems, zippers, and faux leather. It washes out and leaves almost no residue. Careful to not use too much and gunk up your machine.
Helping keep fabric in check
A seam ripper can be used to help keep fabric lined up and in check until the moment is passes under the presser foot. It’s like a small skinny finger.
Narrow hems without a special foot
1) Zigzag along the raw edge, using a wide width and narrow stitch.
2) Turn the raw edge under twice, using lots of pins to old it in place, rather than ironing.
3) Top stitch the hem.
The zigzag helps the fabric from slipping all over tha place, and works as a guide for even turning.
Quick turned edge
Stitch a line of basting stitches where the fold line will go. (Ex: if it says turn edge under ½" and press, stitch a line ½" from the raw edge.) The turn along the line of stitching and press. The stitching makes a line for you to follow, and scores the fabric, making it easier to turn any curves. Remove the basting stitches if there is a chance they’ll show in the finished piece.
Fittings without all the Poking
Instead of using normal pins when trying to do a fitting, especially on yourself, use some safety pins. Obviously having someone to help you do personal fittings is best, but this is a nice alternative when you can’t.
I got like half the stuff traced out, and have half the lining, the padding and interfacing to still trace out, but I need to take a break because of my knee. I really do want to cut them out today, but it all frays badly so I can’t until I’m ready to sew them, which will have to be tomorrow.
